Batch process
DataView can batch process files – this means it can apply a user-defined series of operation to a user-selected series of files, without having to explicitly call up the commands for each operation and each file in sequence. Batch processing can be applied to operations contained within two menus; Transform and Event edit. The Transform menu contains operations that alter the data themselves, while the Event edit menu contains operations that alter events.
Batch processing is supported at two levels: that of single operations, and that of a series of operations to be applied in sequence.
Single operations
Operations that support the batch facility at the individual level have a Batch checkbox within the dialog specifying the parameters of the operation. If you check this box, then when you click OK on the parameter dialog, instead of the operation being applied immediately to the active file, you are presented with a Select ALL files to process dialog in which you select the files to which wish the operation to be applied. You must include the active file itself in your selection if you wish to process the active file. When you dismiss the file selection dialog, the operation is applied in turn to each of the selected files without further user intervention.
File naming for data transform operations
If you check the Write new file box in the parameter dialog then the transformed data are always written to a new dtvw-dat file. You do not explicitly choose names for each transformed file, but instead the new file name is automatically set to be the same as the original file name, but with _tr appended. Thus for an original file called data the transformed data will be written to a file called data_tr.
If you do not select the Write new file option, then the source file will simply be overwritten with the new data if the source file is a DataView dtvw-dat file. If the source file is an original data acquisition file, a new dtvw-dat file will be written with the same filename as the source file.
File naming for Event edit operations
Event edit operations do not have a Write new file option because they never change actual data. In non-batch mode Event edit operations require the user to confirm the changes by explicitly saving the file. In batch mode, edited files are saved automatically, with the changes either written directly into the dtvw-dat file, or, in the case of original acquisition files (non-dtvw-dat), into the dtvw-hdr header file associated with the data file.
Sequences of operations
The Batch: Multi-process batch command allows you to specify a sequence of Transform and/or Event edit commands that can be applied to a series of specified files. Setting up the batch commands can be a bit complicated, and it is probably only worth doing if you have a lot of files to process. (It was originally implemented to accommodate a user who need to process several hundred files.) It is probably a good idea to go through the sequence manually on a trial file before setting up the batch, in order to get a sense of suitable parameters values for the processes.
Example: Detecting Spike Features
- Load the file batch feature detect.
- If you opened the file directly from the web site without downloading it first, then select the File: Save as menu command and save a copy of the file onto your local disk, using the same name.
The file shows an intracellular recording, with a series of spikes arising from EPSPs, with occasional failures. The aim is to detect the peak of the second derivative of the membrane potential associated with each spike. Each peak represents a time when the rate-of-change of the voltage is changing most rapidly (i.e. the rate-of-change of the rate-of-change of voltage is maximal). This is sometimes used as an objective metric for specifying threshold. This can be done in DataView, but it requires several sequential operations. [Since first writing this section of the tutorial the analysis procedures have been incorporated into a single Spike Shape analysis feature, but this section is maintained since it illustrates multi-process batch activity.]
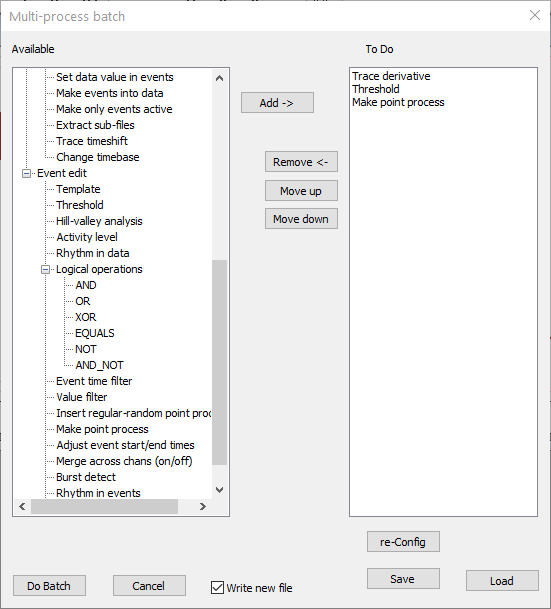
- Select the Batch: Multi-process batch command to call up the Multi-process batch dialog box.
On the left of this dialog box is the Available list, which shows all the operations for which this facility is available. The operations are organized in a tree-like structure that more-or-less replicates the organization of the individual menu commands.
- Click the Trace derivative operation to select it (a sub-set of the Trace transform section in the Available) list.
- Click Add to activate the Derivative dialog box.
- Select 2nd Deriv as your derivative choice.
- Select Savitzky-Golay as the method. This will smooth the output while calculating the second derivative.
Leave the other options unchanged (note the Add trace option is pre-selected, as are the Batch process and Write new file options, but the latter are disabled and cannot be changed). - Click OK in the Derivative dialog. The process is now added to the To Do list in the Multi-process batch dialog.
- Select the Threshold operation (a sub-set of the Event edit section in the Available list).
- Click Add to activate the Threshold dialog. Now things get a bit tricky because you have to think ahead:
- Set the Trace to 2.
Trace 2 does not yet exist, but it will after the derivative operation completes. - Select med +/- rob sd x mult as the choice for the Threshold source
- Set the multiplier to 25.
I actually got this number from a trial run before attempting the batch process, but it is reasonable that spikes should generate the 2nd derivative which is very significantly bigger than the 2nd derivative of background changes in membrane potential. - Set the User time: End to 100 to make sure that the statistics are not captured from an early spike on its own.
- Click OK in the Threshold dialog.
- Set the Trace to 2.
- Select the Make point process operation (a sub-set of the Event edit section in the Available list).
- Click Add to activate the Make point process dialog.
- Set the destination channel to b.
- Set the Parent trace to 2. This trace doesn't exist yet, but it will by the time this operation is activated in the batch.
- Select the Max option in the Timing from group.
- Click OK in the Make point process dialog.
At this stage the dialog should look like this:

You are now ready to go. However, if you wanted to check or adjust any process, select it in the To do list and click the re-Config button. Also, it might be sensible to save your choices, in case you want to re-use them.
- Click Save, and choose a file name for the batch configuration file (with the extension dtvw-batch).
- Click Do batch to start the batch process.
- A File open dialog opens. Select the files that you want to process, including the file that was active as you set up the batch, if you want that file processed.
- In this case, select just the copy of the file batch feature detect that you saved after first opening the sample file. You could select multiple files in the usually way (control-click, or shift-click to get a range), but for this exercise just select the one file.
When you close the File open dialog, the batch process begins.
- Open the windows directory that you saved the file to. You should see a new file, batch feature detect_tr in the directory. Drag this onto Dataview to open it. (Or use the File: Open menu command in Dataview itself.)
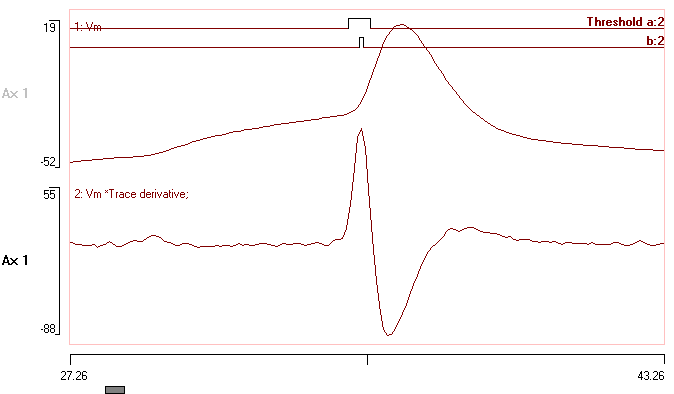
The transformed file should look like this: (I have zoomed in on the first spike for clarity, and made a few other cosmetic edits, but the data are exactly as produced by the series of transforms.)

Event channel b contains point processes that are located at the peaks of the 2nd derivative of the original data trace. These occur at the most rapid change in the rising inflection in the waveform, and this is a reasonable approximation to what experienced electrophysiologist might regard as the spike threshold.
File naming with Multi-process batch
The Multi-transform dialog has a Write new file option which operates similarly to that of the standard transform dialogs. If checked, the output file has the same filename as the input file, but with _tr appended; if unchecked, the output filename is the same as the input filename. All output files are dtvw-dat files, whatever the input file type.